TL;DR
- •Glossworks method: Single bucket with multiple clean wash mitts — superior contamination prevention over the two-bucket method
- •Essential supplies: pH-neutral car shampoo, multiple microfibre mitts, grit guard, dedicated bucket, high-GSM drying towels, soft wheel brushes
- •Washing process: Work in shade (10–25°C), start with wheels, rinse top-down, use straight-line motions, section by section, change mitts regularly
- •Never use: Automatic car washes, dish soap, household sponges, or wash in direct sunlight
- •Frequency: Fortnightly for outdoor/daily drivers, monthly for garage-kept, every 2 weeks minimum for ceramic coated vehicles
A professional detail gives your vehicle that perfect, showroom-fresh appearance — but how you maintain that look between appointments matters just as much. Improper washing is one of the leading causes of swirl marks, water spots, and premature coating deterioration. Done correctly, a regular wash preserves your paint, extends the life of any protective treatment, and keeps your vehicle looking its best year-round.
At Glossworks, we have seen first-hand the difference proper and improper washing makes to a vehicle's long-term condition. This guide shares our professional approach so you can maintain your vehicle confidently between visits.
Why Proper Washing Technique Matters
How you wash your car is just as important as how often you wash it. Incorrect technique introduces damage that accumulates over time:
What Improper Washing Causes
- •Swirl marks and fine scratches in clear coat
- •Water spots and mineral etching
- •Premature deterioration of ceramic coatings
- •Trapped contaminants that bond to paint
What Proper Washing Achieves
- •Preserved finish between professional services
- •Extended life of ceramic coatings and sealants
- •Avoids costly paint correction down the track
- •More effective professional detailing when it comes
The Glossworks Method: Single Bucket, Multiple Mitts
Many detailers recommend the two-bucket method — one for soapy water, one for rinsing the mitt. At Glossworks we use a refined approach: a single bucket of clean soapy water combined with multiple fresh wash mitts.
Rather than repeatedly rinsing a single dirty mitt back into the bucket, you swap to a fresh mitt the moment the current one has picked up significant dirt. This eliminates the risk of dragging contaminated water back across the paint — the primary cause of wash-induced swirl marks.
Why This Works Better
- •Contamination prevention: You are always washing with a clean surface — no dirty rinse water reintroduced to the paint
- •Simplicity: Easier to maintain correct technique without managing two buckets
- •Effectiveness on coated vehicles: Preserves coating integrity where surface marring matters most
What You Need Before You Start
Essential Washing Supplies
- pH-neutral car shampoo: Formulated specifically for automotive finishes — never dish soap or household cleaners
- Multiple microfibre wash mitts: Premium, clean mitts reserved exclusively for washing — have at least 3–4 on hand
- Grit guard: Placed at the bottom of the bucket to trap dirt that falls off the mitt
- Dedicated bucket: Used only for car washing to prevent cross-contamination
- High-GSM microfibre drying towels: The higher the GSM (grams per square metre), the more water they absorb with less contact
- Soft wheel brushes: Designed specifically for wheels and brake dust — never use these on paint
- Pressure washer or hose: For pre-rinsing and final rinse
Additional Supplies for Ceramic Coated Vehicles
- Coating-specific shampoo: Neutral pH formulation that preserves coating hydrophobics rather than stripping them
- Ultra-soft microfibre mitts: Even softer than standard automotive mitts to avoid marring the coating surface
- Ceramic maintenance spray: Optional — a quick spray topper applied during drying to boost beading between professional inspections
The Step-by-Step Washing Process
Step 1 — Choose the Right Time and Place
- Work in the shade: Direct sunlight causes soap and water to dry on the surface before you can rinse it, leaving water spots and soap residue
- Temperature: Ideally 10–25°C — too cold and water spots form faster; too hot and products dry prematurely
- Wind: Avoid washing on windy days where dust and debris can blow back onto wet panels
Step 2 — Pre-Rinse the Entire Vehicle
Before any mitt touches the paint, rinse thoroughly to remove loose dirt, dust, and debris. This is one of the most important steps — washing over loose grit is a guaranteed way to create scratches.
- Start from the top and work downward — gravity is on your side
- Pay particular attention to panel gaps, door shuts, and the lower sections where mud accumulates
- Give the wheels a dedicated pre-rinse to loosen brake dust before you begin washing them
Step 3 — Wash the Wheels First
Wheels are the dirtiest part of any vehicle. Wash them first with dedicated wheel cleaner and brushes before moving to the paint. This prevents brake dust and iron contamination from being flicked onto freshly washed panels.
- Use wheel-specific brushes — never your paint mitts
- Rinse fully before touching any bodywork
Step 4 — Wash the Paint Section by Section
- Start at the roof and work downward panel by panel
- Straight-line motions only — never circular or random. Circular motions create the swirl patterns visible under light
- Rinse each section before the soap has a chance to dry
- Change mitts regularly — as soon as a mitt feels like it is dragging or shows visible dirt, set it aside and use a fresh one
- Lower panels last — sills, bumpers, and door bottoms carry the most grime and should never be washed with a mitt you have used on upper panels
Step 5 — Final Rinse
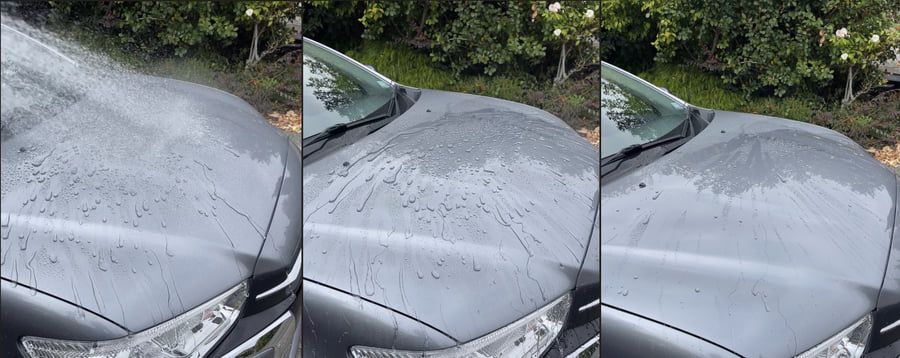
Rinse the entire vehicle with clean water top-to-bottom, ensuring all shampoo residue is removed. On vehicles with ceramic coatings, a "sheeting rinse" — where you allow water to flow off in sheets rather than individual droplets — reduces the amount of drying required.
Step 6 — Dry Immediately
Never let a washed vehicle air dry. Even in Nelson's relatively soft water, air drying leaves mineral deposits and water spots on the surface.
- Blot, don't wipe: Pat drying with a high-GSM microfibre towel is gentler than dragging across the surface
- Separate towels: Use dedicated towels for upper panels and lower areas
- Panel gaps and mirrors: A blast of compressed air or a leaf blower helps remove water from crevices that cause drip marks later
Washing Ceramic Coated Vehicles
If your vehicle has a ceramic coating, the fundamentals are the same but a few extra considerations apply:
- Use lighter pressure: Let the coating's hydrophobic properties do the work — heavy scrubbing is never needed
- Coating-compatible shampoo only: Some shampoos contain gloss enhancers or wax additives that can leave residue on ceramic surfaces
- Avoid interference products: Do not apply spray waxes, polymer sealants, or tyre dressings over a ceramic coating unless they are specifically designed for that purpose
- Wash more frequently: The ease of cleaning a coated vehicle means quick maintenance washes every 1–2 weeks keep it looking its best with minimal effort
Want a Professional Wash Demonstration?
Every ceramic coating service at Glossworks includes a complimentary hands-on wash training session — we show you the exact technique for your specific vehicle.
What happens next: Free consultation → Transparent estimate → Professional application → Follow-up care
Common Washing Mistakes to Avoid
Automatic Car Washes
Never use automatic car washes — particularly on ceramic coated vehicles. The brushes trap contaminants from hundreds of previous vehicles and drag them across your paint. Even "touchless" washes rely on highly alkaline chemicals that degrade protective coatings over time. The short-term convenience is not worth the long-term damage.
Wrong Products
- Dish soap: Strips wax, sealant, and ceramic coatings — not suitable for automotive finishes under any circumstances
- Household sponges: Dense and flat, they trap grit against the paint surface and act like sandpaper
- All-purpose cleaners: Too harsh and not pH-balanced for paint
- Old T-shirts or bath towels: Looped cotton fibres trap particles and scratch clear coat
Poor Habits
- Washing in direct sunlight: Soap dries before you can rinse it, leaving residue and water spots
- Starting from the bottom: You drag the heaviest contamination up across clean upper panels
- Letting the vehicle air dry: Near-guaranteed water spots regardless of water quality
- Storing dirty mitts and towels: Contaminated equipment reintroduces grit to the paint on every subsequent wash
Washing Frequency: How Often Is Enough?
| Vehicle Type | Recommended Frequency |
|---|---|
| Outdoor parking / daily driver | Fortnightly |
| Garage-kept / moderate use | Monthly |
| Ceramic coated vehicle | Every 2 weeks minimum |
| After rain, pollen, or bird droppings | As soon as possible |
Special Situations
Bird Droppings and Tree Sap
Remove these immediately — bird droppings are acidic and can etch clear coat within hours in warm conditions. Soak with water or a dedicated bird dropping remover and blot gently. Never wipe dry contamination as this grinds the acidic material into the paint.
Winter and Road Grime
Nelson winters bring mud, rain, and general road contamination. Wash more frequently during winter months than your usual schedule — and pay extra attention to wheel arches and lower panels. Even a thorough pre-rinse on days when you cannot fit in a full wash removes the worst of the contamination before it bonds to the paint.
Pollen Season
Rinse often during spring to remove pollen before it accumulates. Never wipe dry pollen off the surface — pre-soak first to soften it, then rinse away rather than dragging it across the paint.
When to Book a Professional Detail
Even with perfect washing technique, some things only a professional can address:
- Diminished water beading: Your coating or sealant protection is wearing thin
- Water spots that won't wash off: Mineral etching has occurred and requires professional treatment
- Visible swirl marks under light: Paint correction is needed before they worsen
- Dull appearance despite regular washing: Oxidation or contamination that washing alone cannot address
For ceramic coated vehicles, we recommend a professional inspection every 6–12 months to assess coating condition and perform any necessary maintenance topping.
Frequently Asked Questions About Car Washing
What is the best way to wash a car without causing swirl marks?
Use a pH-neutral car shampoo, multiple clean microfibre mitts (changed as soon as they pick up visible dirt), and always work in straight-line motions — never circles. Start at the roof and work downward, finishing with the lower panels. Rinse thoroughly and dry immediately with a high-GSM microfibre towel.
Can I use dish soap to wash my car?
No. Dish soap is too alkaline and strips protective coatings, waxes, and sealants from the paint. Always use a dedicated pH-neutral automotive shampoo.
How often should I wash my car?
Fortnightly for outdoor or daily-driven vehicles. Garage-kept vehicles can go monthly. Ceramic-coated vehicles benefit from a wash every two weeks at minimum to take advantage of the coating's easy-clean properties and prevent contamination build-up.
Is it safe to use an automatic car wash on a ceramic coated vehicle?
No. Automatic car wash brushes harbour contaminants from previous vehicles and create swirl marks. Even touchless washes use harsh chemicals that degrade ceramic coatings over time. Always hand wash coated vehicles.
What is the single bucket method for washing a car?
The single bucket method uses one bucket of clean soapy water with multiple fresh wash mitts. Instead of rinsing a dirty mitt back into the bucket, you swap to a fresh mitt once the current one is soiled. This prevents contaminated water from being dragged back across the paint — the primary cause of wash-induced swirl marks.
How do I remove bird droppings safely from my car?
Act quickly — bird droppings can etch clear coat within hours. Soak the area with water or a quick detailer spray, allow it to soften for a minute, then gently blot (not wipe) with a clean microfibre cloth. Never scrub dry bird droppings.
The Bottom Line
The time you invest in proper washing technique pays dividends in maintaining your vehicle's appearance, protecting its value, and extending the life of any professional treatments. It does not require expensive equipment — just the right supplies, the right process, and consistency.
At Glossworks, we include a complimentary hands-on wash training session with every ceramic coating service, tailored to your specific vehicle. Even if you have not had a coating applied, we are always happy to provide personalised washing advice for your situation.